Turn the Practically Perfect Tee into a Practically Perfect Dress

Turn the Practically Perfect Tee into a Practically Perfect Dress - a tutorial from Muse of the Morning

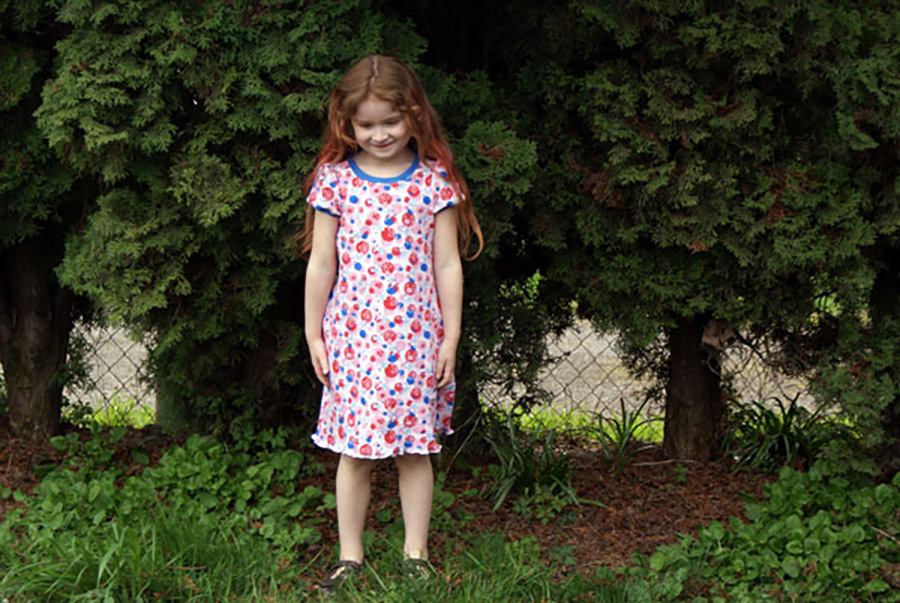
And another tutorial to extend the Practically Perfect Tee Shirt Pattern! This dress will be so much fun for running around in the summer and can really be made any length- make it longer and it will last longer as a dress and eventually as a top for your little girl, or make it knee length and enjoy the freedom running around at the park!
And another tutorial to extend the Practically Perfect Tee Shirt Pattern! This dress will be so much fun for running around in the summer and can really be made any length- make it longer and it will last longer as a dress and eventually as a top for your little girl, or make it knee length and enjoy the freedom running around at the park!


For this pattern extension, you will need 1.5 – 2 yards of interlock for the body, depending on how long you want to make the dress.

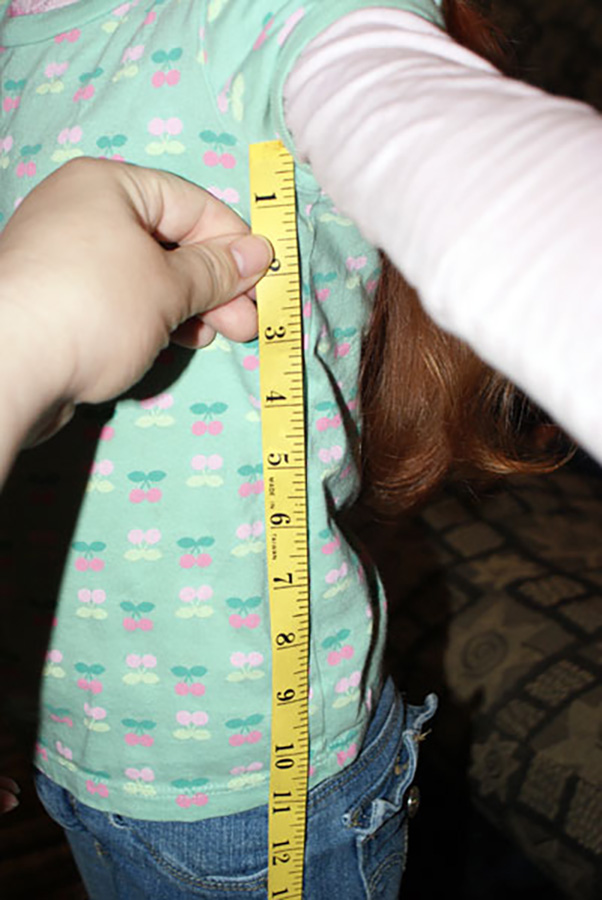
First, measure your child from the bottom of her arm pit down to the length you want the dress to go. I like a knee length dress, so my measurement is 21 inches for my tall size 5 girl. If you want to hem the dress, add an inch to your measurement. If you want to just do a lettuce hem (which I love) you don’t need to add anything. We’re going to call this measurement “X”.


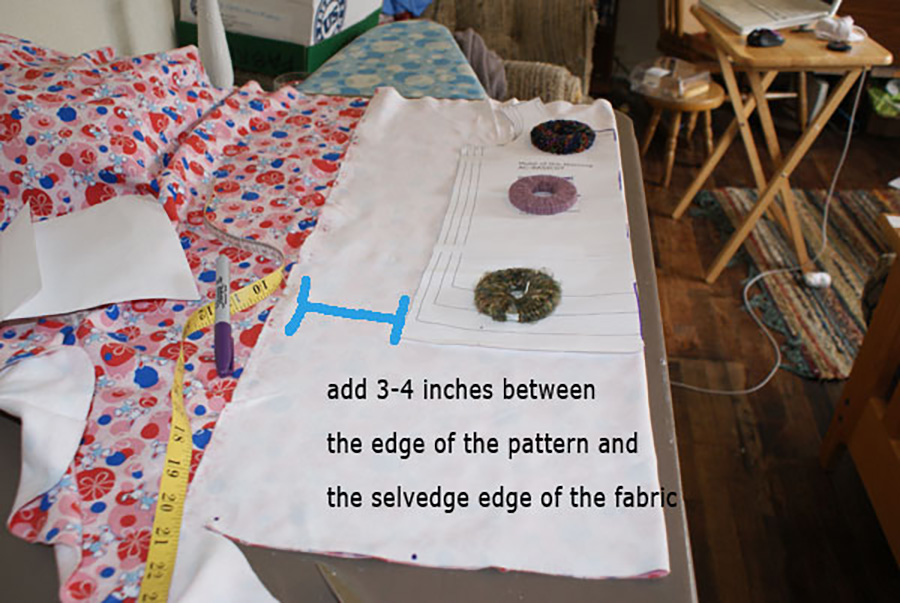
Now, lay out the back body piece (Piece A) of the pattern on the fold of your fabric. You’ll want to add 3-4 inches to the width for a knee length dress- add even more inches to the width for a longer dress or for a child with a bigger booty.


Measure straight down from the bottom of the arm hole on the pattern to the length you measured – X. Mark this spot with dressmakers chalk or a pencil (Turquoise line in the picture).
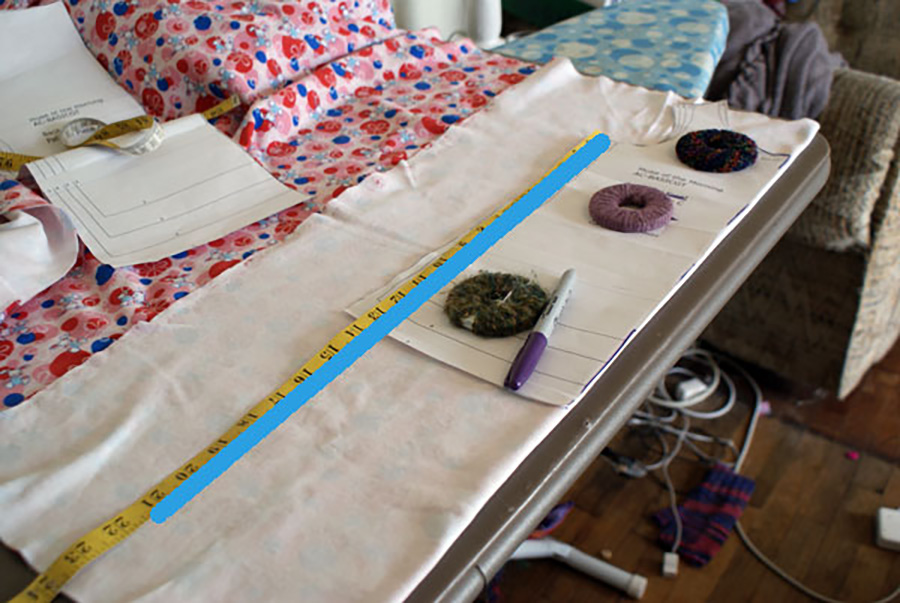


Now swing your measuring tape out 3-4 inches and mark measurement X there (Purple line in the picture).
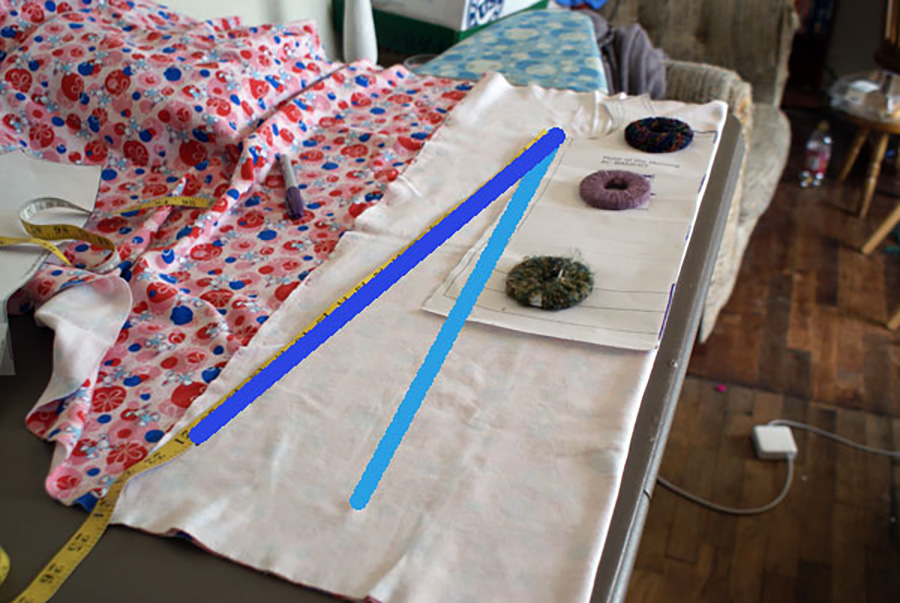


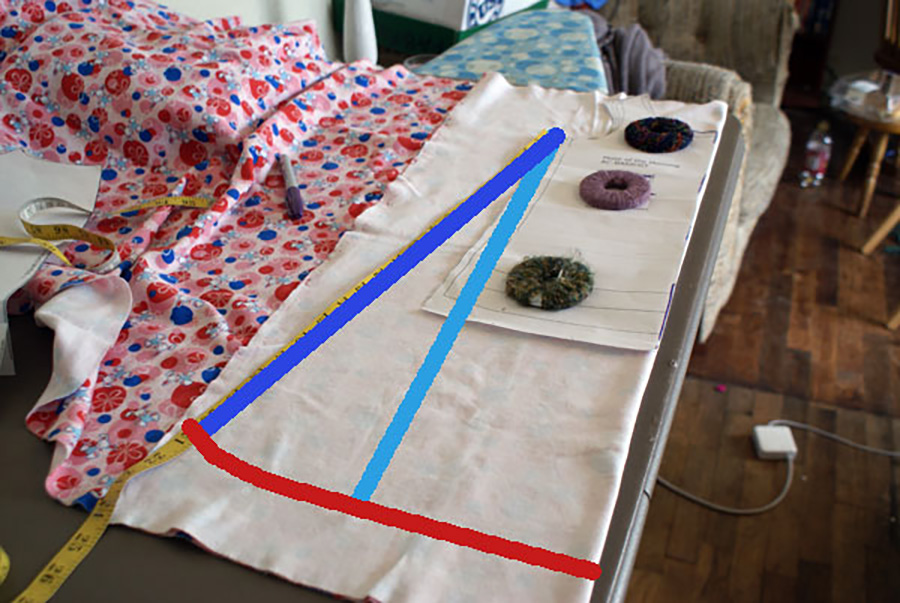
Now, mark a line connecting your two dots and extending out to the folded edge of the fabric (Red line). Cut along this line for the bottom.


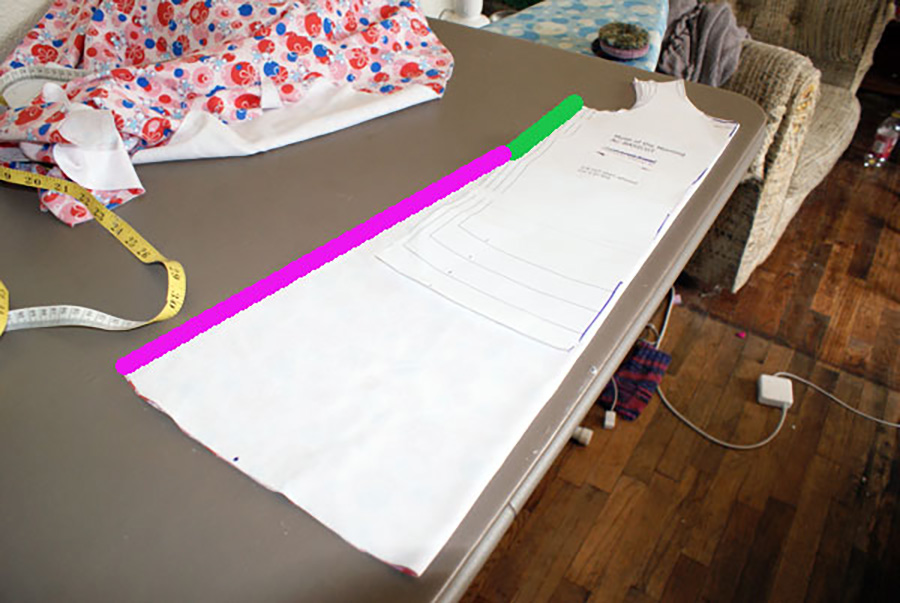
Cut out the top part of the pattern. As you are cutting the side, cut along the pattern piece for 5-6 inches (Green Line), then angle out to meet that last mark you made at the bottom (Pink line).


Repeat these instructions with the front body piece (Piece B).

Finish the dress as instructed in your pattern instructions, cutting out and attaching sleeves, neck binding and any other pieces. You can also turn this dress into a tank dress with this tutorial.

Finish the hem as instructed or do a lettuce edge (my favorite way to finish a girls tee!).

And voila! You’ve made it into a lovely little dress. I was kind of thinking this would be Little Miss’s Easter dress.
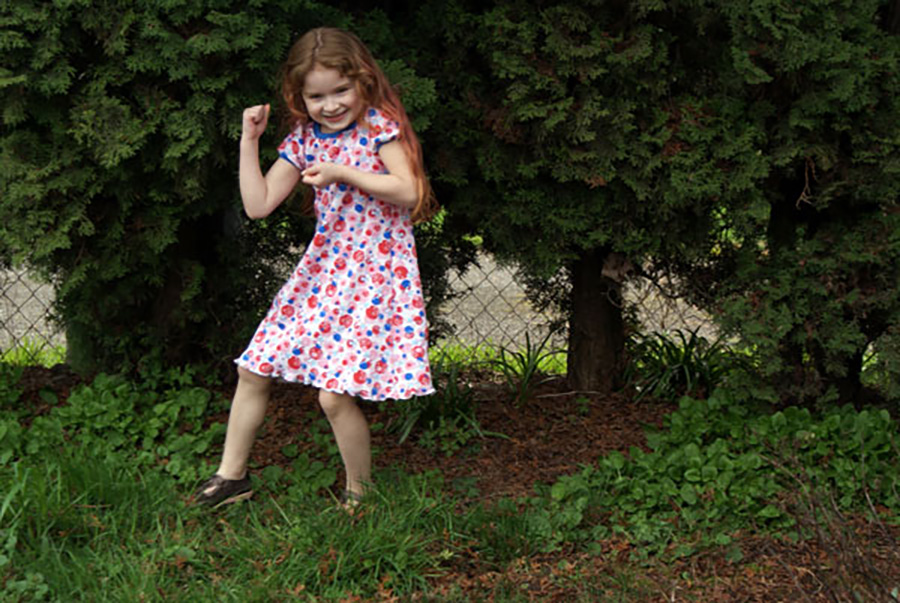
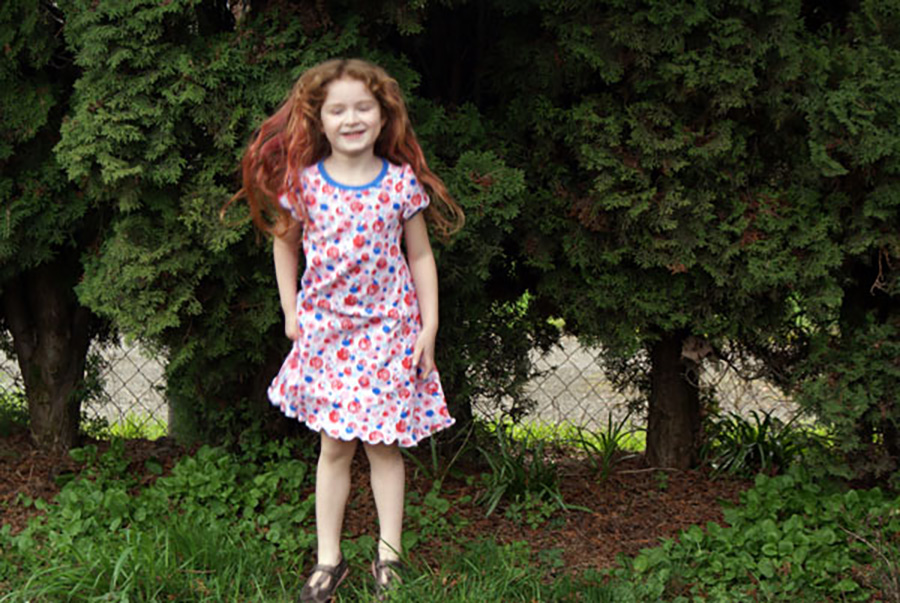


You can find the Practically Perfect Tee Shirt Pattern in our etsy shop!!

This post was published on Muse of the Morning.com

For this pattern extension, you will need 1.5 – 2 yards of interlock for the body, depending on how long you want to make the dress.

First, measure your child from the bottom of her arm pit down to the length you want the dress to go. I like a knee length dress, so my measurement is 21 inches for my tall size 5 girl. If you want to hem the dress, add an inch to your measurement. If you want to just do a lettuce hem (which I love) you don’t need to add anything. We’re going to call this measurement “X”.

And another tutorial to extend the Practically Perfect Tee Shirt Pattern! This dress will be so much fun for running around in the summer and can really be made any length- make it longer and it will last longer as a dress and eventually as a top for your little girl, or make it knee length and enjoy the freedom running around at the park!


For this pattern extension, you will need 1.5 – 2 yards of interlock for the body, depending on how long you want to make the dress.

First, measure your child from the bottom of her arm pit down to the length you want the dress to go. I like a knee length dress, so my measurement is 21 inches for my tall size 5 girl. If you want to hem the dress, add an inch to your measurement. If you want to just do a lettuce hem (which I love) you don’t need to add anything. We’re going to call this measurement “X”.


Now, lay out the back body piece (Piece A) of the pattern on the fold of your fabric. You’ll want to add 3-4 inches to the width for a knee length dress- add even more inches to the width for a longer dress or for a child with a bigger booty.


Measure straight down from the bottom of the arm hole on the pattern to the length you measured – X. Mark this spot with dressmakers chalk or a pencil (Turquoise line in the picture).


Now swing your measuring tape out 3-4 inches and mark measurement X there (Purple line in the picture).


Now, mark a line connecting your two dots and extending out to the folded edge of the fabric (Red line). Cut along this line for the bottom.


Cut out the top part of the pattern. As you are cutting the side, cut along the pattern piece for 5-6 inches (Green Line), then angle out to meet that last mark you made at the bottom (Pink line).


Repeat these instructions with the front body piece (Piece B).

Finish the dress as instructed in your pattern instructions, cutting out and attaching sleeves, neck binding and any other pieces. You can also turn this dress into a tank dress with this tutorial.

Finish the hem as instructed or do a lettuce edge (my favorite way to finish a girls tee!).

And voila! You’ve made it into a lovely little dress. I was kind of thinking this would be Little Miss’s Easter dress.


You can find the Practically Perfect Tee Shirt Pattern in our etsy shop!!

This post was published on Muse of the Morning.com

Now, lay out the back body piece (Piece A) of the pattern on the fold of your fabric. You’ll want to add 3-4 inches to the width for a knee length dress- add even more inches to the width for a longer dress or for a child with a bigger booty.

And another tutorial to extend the Practically Perfect Tee Shirt Pattern! This dress will be so much fun for running around in the summer and can really be made any length- make it longer and it will last longer as a dress and eventually as a top for your little girl, or make it knee length and enjoy the freedom running around at the park!


For this pattern extension, you will need 1.5 – 2 yards of interlock for the body, depending on how long you want to make the dress.

First, measure your child from the bottom of her arm pit down to the length you want the dress to go. I like a knee length dress, so my measurement is 21 inches for my tall size 5 girl. If you want to hem the dress, add an inch to your measurement. If you want to just do a lettuce hem (which I love) you don’t need to add anything. We’re going to call this measurement “X”.


Now, lay out the back body piece (Piece A) of the pattern on the fold of your fabric. You’ll want to add 3-4 inches to the width for a knee length dress- add even more inches to the width for a longer dress or for a child with a bigger booty.


Measure straight down from the bottom of the arm hole on the pattern to the length you measured – X. Mark this spot with dressmakers chalk or a pencil (Turquoise line in the picture).


Now swing your measuring tape out 3-4 inches and mark measurement X there (Purple line in the picture).


Now, mark a line connecting your two dots and extending out to the folded edge of the fabric (Red line). Cut along this line for the bottom.


Cut out the top part of the pattern. As you are cutting the side, cut along the pattern piece for 5-6 inches (Green Line), then angle out to meet that last mark you made at the bottom (Pink line).


Repeat these instructions with the front body piece (Piece B).

Finish the dress as instructed in your pattern instructions, cutting out and attaching sleeves, neck binding and any other pieces. You can also turn this dress into a tank dress with this tutorial.

Finish the hem as instructed or do a lettuce edge (my favorite way to finish a girls tee!).

And voila! You’ve made it into a lovely little dress. I was kind of thinking this would be Little Miss’s Easter dress.


You can find the Practically Perfect Tee Shirt Pattern in our etsy shop!!

This post was published on Muse of the Morning.com

Measure straight down from the bottom of the arm hole on the pattern to the length you measured – X. Mark this spot with dressmakers chalk or a pencil (Turquoise line in the picture).

And another tutorial to extend the Practically Perfect Tee Shirt Pattern! This dress will be so much fun for running around in the summer and can really be made any length- make it longer and it will last longer as a dress and eventually as a top for your little girl, or make it knee length and enjoy the freedom running around at the park!


For this pattern extension, you will need 1.5 – 2 yards of interlock for the body, depending on how long you want to make the dress.

First, measure your child from the bottom of her arm pit down to the length you want the dress to go. I like a knee length dress, so my measurement is 21 inches for my tall size 5 girl. If you want to hem the dress, add an inch to your measurement. If you want to just do a lettuce hem (which I love) you don’t need to add anything. We’re going to call this measurement “X”.


Now, lay out the back body piece (Piece A) of the pattern on the fold of your fabric. You’ll want to add 3-4 inches to the width for a knee length dress- add even more inches to the width for a longer dress or for a child with a bigger booty.


Measure straight down from the bottom of the arm hole on the pattern to the length you measured – X. Mark this spot with dressmakers chalk or a pencil (Turquoise line in the picture).


Now swing your measuring tape out 3-4 inches and mark measurement X there (Purple line in the picture).


Now, mark a line connecting your two dots and extending out to the folded edge of the fabric (Red line). Cut along this line for the bottom.


Cut out the top part of the pattern. As you are cutting the side, cut along the pattern piece for 5-6 inches (Green Line), then angle out to meet that last mark you made at the bottom (Pink line).


Repeat these instructions with the front body piece (Piece B).

Finish the dress as instructed in your pattern instructions, cutting out and attaching sleeves, neck binding and any other pieces. You can also turn this dress into a tank dress with this tutorial.

Finish the hem as instructed or do a lettuce edge (my favorite way to finish a girls tee!).

And voila! You’ve made it into a lovely little dress. I was kind of thinking this would be Little Miss’s Easter dress.


You can find the Practically Perfect Tee Shirt Pattern in our etsy shop!!

This post was published on Muse of the Morning.com

Now swing your measuring tape out 3-4 inches and mark measurement X there (Purple line in the picture).

And another tutorial to extend the Practically Perfect Tee Shirt Pattern! This dress will be so much fun for running around in the summer and can really be made any length- make it longer and it will last longer as a dress and eventually as a top for your little girl, or make it knee length and enjoy the freedom running around at the park!


For this pattern extension, you will need 1.5 – 2 yards of interlock for the body, depending on how long you want to make the dress.

First, measure your child from the bottom of her arm pit down to the length you want the dress to go. I like a knee length dress, so my measurement is 21 inches for my tall size 5 girl. If you want to hem the dress, add an inch to your measurement. If you want to just do a lettuce hem (which I love) you don’t need to add anything. We’re going to call this measurement “X”.


Now, lay out the back body piece (Piece A) of the pattern on the fold of your fabric. You’ll want to add 3-4 inches to the width for a knee length dress- add even more inches to the width for a longer dress or for a child with a bigger booty.


Measure straight down from the bottom of the arm hole on the pattern to the length you measured – X. Mark this spot with dressmakers chalk or a pencil (Turquoise line in the picture).


Now swing your measuring tape out 3-4 inches and mark measurement X there (Purple line in the picture).


Now, mark a line connecting your two dots and extending out to the folded edge of the fabric (Red line). Cut along this line for the bottom.


Cut out the top part of the pattern. As you are cutting the side, cut along the pattern piece for 5-6 inches (Green Line), then angle out to meet that last mark you made at the bottom (Pink line).


Repeat these instructions with the front body piece (Piece B).

Finish the dress as instructed in your pattern instructions, cutting out and attaching sleeves, neck binding and any other pieces. You can also turn this dress into a tank dress with this tutorial.

Finish the hem as instructed or do a lettuce edge (my favorite way to finish a girls tee!).

And voila! You’ve made it into a lovely little dress. I was kind of thinking this would be Little Miss’s Easter dress.


You can find the Practically Perfect Tee Shirt Pattern in our etsy shop!!

This post was published on Muse of the Morning.com

Now, mark a line connecting your two dots and extending out to the folded edge of the fabric (Red line). Cut along this line for the bottom.

And another tutorial to extend the Practically Perfect Tee Shirt Pattern! This dress will be so much fun for running around in the summer and can really be made any length- make it longer and it will last longer as a dress and eventually as a top for your little girl, or make it knee length and enjoy the freedom running around at the park!


For this pattern extension, you will need 1.5 – 2 yards of interlock for the body, depending on how long you want to make the dress.

First, measure your child from the bottom of her arm pit down to the length you want the dress to go. I like a knee length dress, so my measurement is 21 inches for my tall size 5 girl. If you want to hem the dress, add an inch to your measurement. If you want to just do a lettuce hem (which I love) you don’t need to add anything. We’re going to call this measurement “X”.


Now, lay out the back body piece (Piece A) of the pattern on the fold of your fabric. You’ll want to add 3-4 inches to the width for a knee length dress- add even more inches to the width for a longer dress or for a child with a bigger booty.


Measure straight down from the bottom of the arm hole on the pattern to the length you measured – X. Mark this spot with dressmakers chalk or a pencil (Turquoise line in the picture).


Now swing your measuring tape out 3-4 inches and mark measurement X there (Purple line in the picture).


Now, mark a line connecting your two dots and extending out to the folded edge of the fabric (Red line). Cut along this line for the bottom.


Cut out the top part of the pattern. As you are cutting the side, cut along the pattern piece for 5-6 inches (Green Line), then angle out to meet that last mark you made at the bottom (Pink line).


Repeat these instructions with the front body piece (Piece B).

Finish the dress as instructed in your pattern instructions, cutting out and attaching sleeves, neck binding and any other pieces. You can also turn this dress into a tank dress with this tutorial.

Finish the hem as instructed or do a lettuce edge (my favorite way to finish a girls tee!).

And voila! You’ve made it into a lovely little dress. I was kind of thinking this would be Little Miss’s Easter dress.


You can find the Practically Perfect Tee Shirt Pattern in our etsy shop!!

This post was published on Muse of the Morning.com

Cut out the top part of the pattern. As you are cutting the side, cut along the pattern piece for 5-6 inches (Green Line), then angle out to meet that last mark you made at the bottom (Pink line).

And another tutorial to extend the Practically Perfect Tee Shirt Pattern! This dress will be so much fun for running around in the summer and can really be made any length- make it longer and it will last longer as a dress and eventually as a top for your little girl, or make it knee length and enjoy the freedom running around at the park!


For this pattern extension, you will need 1.5 – 2 yards of interlock for the body, depending on how long you want to make the dress.

First, measure your child from the bottom of her arm pit down to the length you want the dress to go. I like a knee length dress, so my measurement is 21 inches for my tall size 5 girl. If you want to hem the dress, add an inch to your measurement. If you want to just do a lettuce hem (which I love) you don’t need to add anything. We’re going to call this measurement “X”.


Now, lay out the back body piece (Piece A) of the pattern on the fold of your fabric. You’ll want to add 3-4 inches to the width for a knee length dress- add even more inches to the width for a longer dress or for a child with a bigger booty.


Measure straight down from the bottom of the arm hole on the pattern to the length you measured – X. Mark this spot with dressmakers chalk or a pencil (Turquoise line in the picture).


Now swing your measuring tape out 3-4 inches and mark measurement X there (Purple line in the picture).


Now, mark a line connecting your two dots and extending out to the folded edge of the fabric (Red line). Cut along this line for the bottom.


Cut out the top part of the pattern. As you are cutting the side, cut along the pattern piece for 5-6 inches (Green Line), then angle out to meet that last mark you made at the bottom (Pink line).


Repeat these instructions with the front body piece (Piece B).

Finish the dress as instructed in your pattern instructions, cutting out and attaching sleeves, neck binding and any other pieces. You can also turn this dress into a tank dress with this tutorial.

Finish the hem as instructed or do a lettuce edge (my favorite way to finish a girls tee!).

And voila! You’ve made it into a lovely little dress. I was kind of thinking this would be Little Miss’s Easter dress.


You can find the Practically Perfect Tee Shirt Pattern in our etsy shop!!

This post was published on Muse of the Morning.com

Repeat these instructions with the front body piece (Piece B).

Finish the dress as instructed in your pattern instructions, cutting out and attaching sleeves, neck binding and any other pieces. You can also turn this dress into a tank dress with this tutorial.

Finish the hem as instructed or do a lettuce edge (my favorite way to finish a girls tee!).

And voila! You’ve made it into a lovely little dress. I was kind of thinking this would be Little Miss’s Easter dress.

And another tutorial to extend the Practically Perfect Tee Shirt Pattern! This dress will be so much fun for running around in the summer and can really be made any length- make it longer and it will last longer as a dress and eventually as a top for your little girl, or make it knee length and enjoy the freedom running around at the park!


For this pattern extension, you will need 1.5 – 2 yards of interlock for the body, depending on how long you want to make the dress.

First, measure your child from the bottom of her arm pit down to the length you want the dress to go. I like a knee length dress, so my measurement is 21 inches for my tall size 5 girl. If you want to hem the dress, add an inch to your measurement. If you want to just do a lettuce hem (which I love) you don’t need to add anything. We’re going to call this measurement “X”.


Now, lay out the back body piece (Piece A) of the pattern on the fold of your fabric. You’ll want to add 3-4 inches to the width for a knee length dress- add even more inches to the width for a longer dress or for a child with a bigger booty.


Measure straight down from the bottom of the arm hole on the pattern to the length you measured – X. Mark this spot with dressmakers chalk or a pencil (Turquoise line in the picture).


Now swing your measuring tape out 3-4 inches and mark measurement X there (Purple line in the picture).


Now, mark a line connecting your two dots and extending out to the folded edge of the fabric (Red line). Cut along this line for the bottom.


Cut out the top part of the pattern. As you are cutting the side, cut along the pattern piece for 5-6 inches (Green Line), then angle out to meet that last mark you made at the bottom (Pink line).


Repeat these instructions with the front body piece (Piece B).

Finish the dress as instructed in your pattern instructions, cutting out and attaching sleeves, neck binding and any other pieces. You can also turn this dress into a tank dress with this tutorial.

Finish the hem as instructed or do a lettuce edge (my favorite way to finish a girls tee!).

And voila! You’ve made it into a lovely little dress. I was kind of thinking this would be Little Miss’s Easter dress.


You can find the Practically Perfect Tee Shirt Pattern in our etsy shop!!

This post was published on Muse of the Morning.com

You can find the Practically Perfect Tee Shirt Pattern in our etsy shop!!

Pin this post for later by using the image below!

This post was published on Muse of the Morning.com

Leave a Reply

Your email address will not be published. Required fields are marked *

This site uses Akismet to reduce spam. Learn how your comment data is processed.